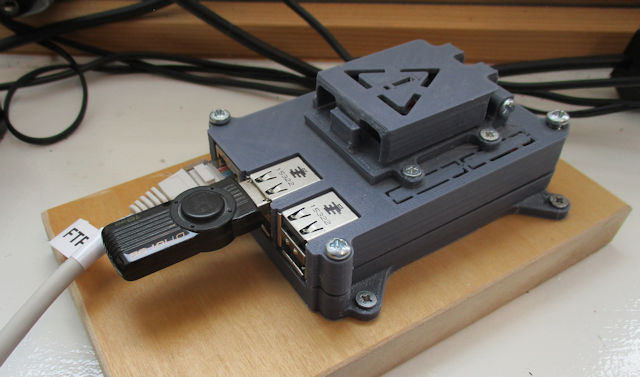
Figure 1 : Raspberry Pi file server node
A fundamental requirement of any network is to transfer files from one host to another. Back in the early days of the Internet this functionality was centralised as a File Server: Link, a server that you could upload files to and download files from. These early file servers typically used the File Transfer Protocol (FTP), however, this protocol is now a little dated, not supporting encryption. This does not mean that the FTP protocol does not have its place. To state the obvious when you launch a data packet onto the Internet you have no idea who will read it, but that does not mean that all data needs to be encrypted. For some applications encryption is simply a waste of time and energy/power e.g. downloading an image of the latest versions of your favourite Raspberry Pi OS. Nowadays the default is to encrypt everything which i can understand, but i do sometimes wonder how many power stations are needed to power these computers, to encrypt and decrypt data that could have been sent as plain text?
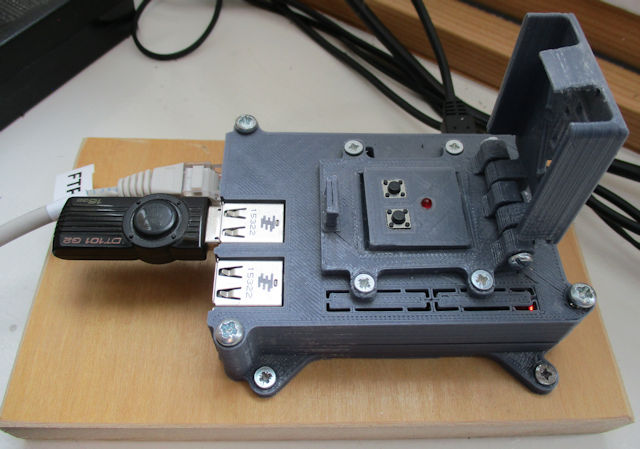

Figure 2 : Raspberry Pi case switches and LED.
This file server is based on an old Pi-2, 32GB sdcard and an external 16GB USB drive, giving the user approximately 36GB of useable storage (once you remove OS overheads). As this is a Pi-2 we have access to an external reset pin, so i also added two switches and an LED. One push switch is connected to the reset pin and GND, allowing the user to reset the Pi, or restart the Pi if it has been shutdown. The second switch and the LED are connected to GPIO pins, giving the user a shutdown button via the Bash (launched from crontab @reboot) and Python scripts below:
#!/bin/sh
sudo /usr/bin/python /home/pi/bin/shutdown.py
import RPi.GPIO as GPIO
import time
import os

GPIO.setmode(GPIO.BCM)
GPIO.setup(18, GPIO.IN, pull_up_down=GPIO.PUD_UP)
GPIO.setup(17, GPIO.OUT)

try:
    GPIO.output(17, False)
    GPIO.wait_for_edge(18, GPIO.FALLING)
    for i in range(0, 5):
      GPIO.output(17, True)
      time.sleep(0.5)
      GPIO.output(17, False)
      time.sleep(0.5)

    print("shutdown -h now")
    os.system("shutdown -h now")
except:
    pass
GPIO.cleanup()
Note, after repeatedly forgetting which switch was which i painted one RED and one GREEN, RED is for RESET (danger) and green is shutdown (safe). To give the user some feedback that the shutdown switch has been pressed, the LED is flashed five times.
In this file server we will be using a range of different network protocols, some encrypted and some not e.g. File Transfer Protocol (FTP), Secure File Transfer Protocol (SFTP) and Hypertext Transfer Protocol (HTTP). For more information on these protocols refer to: FTP, SFTP and HTTP.
From a software point of view there are a number of different FTP servers that could be installed, however, the flavour of the moment seems to be vsftpd Link, so to keep things simple thats what i used and was installed using the command:
sudo apt-get install vsftpd
The configuration file for vsftpd is stored in: /etc/vsftpd.conf, a copy of the File node's file is shown below:
# Example config file /etc/vsftpd.conf
#
listen=NO
listen_ipv6=YES
#
# Allow anonymous FTP? (Disabled by default).
anonymous_enable=NO
#
# Uncomment this to allow local users to log in.
local_enable=YES
#
# Uncomment this to enable any form of FTP write command.
write_enable=YES
#
# Default umask for local users is 077. You may wish to change this to 022,
# if your users expect that (022 is used by most other ftpd's)
local_umask=022
#
# Activate directory messages - messages given to remote users when they
# go into a certain directory.
dirmessage_enable=YES
#
# If enabled, vsftpd will display directory listings with the time
# in  your  local  time  zone.  The default is to display GMT. The
# times returned by the MDTM FTP command are also affected by this
# option.
use_localtime=YES
#
# Activate logging of uploads/downloads.
xferlog_enable=YES
#
# Make sure PORT transfer connections originate from port 20 (ftp-data).
connect_from_port_20=YES
#
# You may fully customise the login banner string:
ftpd_banner=Welcome to Bobs FTP service.
#
# You may restrict local users to their home directories.  See the FAQ for
# the possible risks in this before using chroot_local_user or
# chroot_list_enable below.
chroot_local_user=YES
#allow_writeable_chroot=YES
#
# Customization
#
# This option should be the name of a directory which is empty.  Also, the
# directory should not be writable by the ftp user. This directory is used
# as a secure chroot() jail at times vsftpd does not require filesystem
# access.
secure_chroot_dir=/var/run/vsftpd/empty
#
# This string is the name of the PAM service vsftpd will use.
pam_service_name=vsftpd
#
# This option specifies the location of the RSA certificate to use for SSL
# encrypted connections.
rsa_cert_file=/etc/ssl/certs/ssl-cert-snakeoil.pem
rsa_private_key_file=/etc/ssl/private/ssl-cert-snakeoil.key
ssl_enable=NO
#
# Uncomment this to indicate that vsftpd use a utf8 filesystem.
#utf8_filesystem=YES

user_sub_token=$USER
local_root=/home/$USER/ftp
To help separate / control user and ftp accounts i created a user account just for FTP transfers, as the FTP protocol is not encrypted, so sending plain text usernames and passwords is not desirable :). Therefore, the FTP server should be considered as a server that is open to all. That does not mean that anyone can access this server, you still need to send a user name and password, rather that the data that can be accessed from this server is non-sensitive, public data, a file server with limited access security. On this server the FTP account name is bob, to create bob:
sudo useradd -m bob
sudo passwd bob
Next, create the ftp root directory (ftp) and the working directories (download and upload):
mkdir /home/bob/ftp
mkdir /home/bob/ftp/upload
mkdir /home/bob/ftp/download
A key thing to note is that user read/write are limited to this directory, preventing remote access to other areas of your disk. In addition to this i like to make the download directory read-only and the upload directory read-write. In addition to this i also want to stop bob deleting these directories, so:
sudo chown pi:pi /home/bob/ftp/upload
sudo chown pi:pi /home/bob/ftp/download
sudo chmod 777 /home/bob/ftp/upload
sudo chmod 755 /home/bob/ftp/download
Then to stop the FTP server getting upset, giving you a 500 error message, you need to make the ftp root directory none writeable.
sudo chmod a-w /home/bob/ftp
To ensure everything is ok, a reboot is recommended. Then to access data from the server you can use a number of different clients. The original method was to use a text / command based application. Nowadays these have been replaced by GUI based applications, however, this approach still has its place, especially if you want to automate FTP transfers using scripts. To install the FTP client:
sudo apt-get install ftp
To start the ftp-client simply type:
ftp
A list of commonly used FTP commands are listed below:
| Command | Description |
|---|---|
| ! | Escape to the shell. |
| ? | Print local help information. |
| append | Append to a file. |
| ascii | Set ascii transfer type. |
| bell | Beep when command completed. |
| binary | Set binary transfer type. |
| bye | Terminate FTP session and exit. |
| cd | Change remote working directory. |
| close | Terminate FTP session. |
| debug | Toggle/set debugging mode. |
| delete | Delete remote file. |
| dir | List contents of remote directory. |
| disconnect | Terminate FTP session. |
| get | Receive file. |
| glob | Toggle meta character expansion of local file names. |
| hash | Toggle printing ‘#’ for each buffer transferred. |
| help | Display local help information. |
| lcd | Change local working directory. |
| ls | List contents of remote directory. |
| mdelete | Delete multiple files. |
| mdir | List contents of multiple remote directories. |
| mget | Get multiple files. |
| mkdir | Make directory on remote machine. |
| mls | List contents of multiple remote directories. |
| mput | Send multiple files. |
| open | Connect to remote ftp. |
| prompt | Force interactive prompting on multiple commands. |
| put | Send one file. |
| pwd | Print working directory on remote machine. |
| quit | Terminate ftp session and exit. |
| quote | Send arbitrary ftp command. |
| recv | Receive file. |
| rename | Rename file. |
| rhelp | Get help from remote server. |
| rmdir | Remove directory on remote machine. |
| send | Send one file. |
| status | Show current status. |
| trace | Toggle packet tracing. |
| type | Set file transfer type. |
| user | Send new user information. |
| verbose | Toggle verbose mode. |
Figure 2 : common FTP commands
Some screenshots of files being uploaded and downloaded to and from the FTP server are shown below.
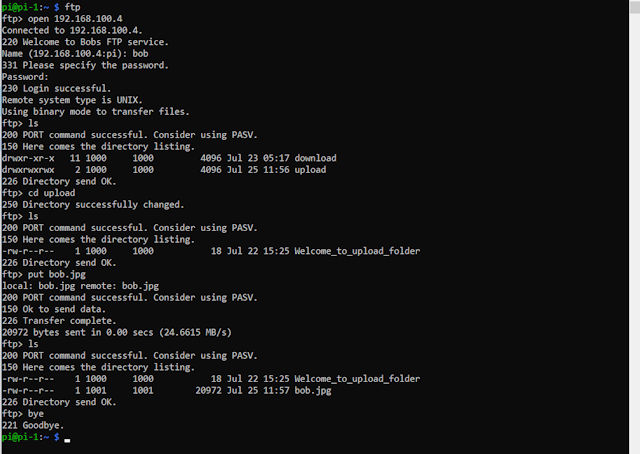
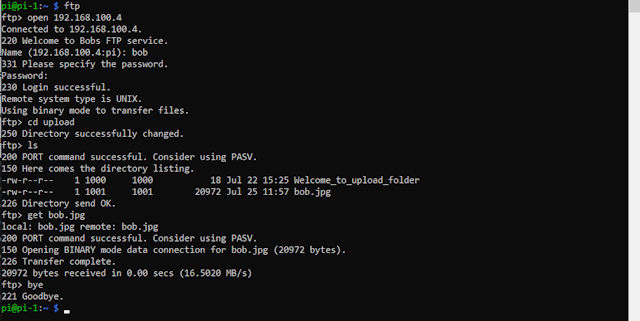
Figure 3 : uploading and downloading files using the ftp-client.
A key advantage of the command line ftp-client is the ability to script ftp transfers, below is an example script to upload a test file:
#!/bin/sh

HOST="192.168.100.4"
USER="bob"
PASSWORD="1234"
FILE="test_file"

ftp -inv << CMD
open $HOST
user $USER $PASSWORD
cd upload
put $FILE
bye
CMD

Figure 4 : scripted file upload.
Two other useful commandline tools are wget Link and curl Link. If not already installed:
sudo apt-get install wget
sudo apt-get install curl
Some examples of these commandline tools using ftp:
wget --ftp-user=FTP_USERNAME --ftp-password='FTP_PASSWORD' ftp://URL/PATH_TO_FILE/FILE_NAME
curl --user FTP_USERNAME:FTP_PASSWORD ftp://URL/PATH_TO_FILE/FILE_NAME

Figure 5 : wget download.
Commandline is sometimes the way to got, but other times a GUI can significantly simplify things. Again the are a number of existing graphical software packages that can be used, or special ftp applications. Most OSs will allow you to mount the FTP server into your filing system, just simply type out the protocol://host, you will then be asked for a username and password.
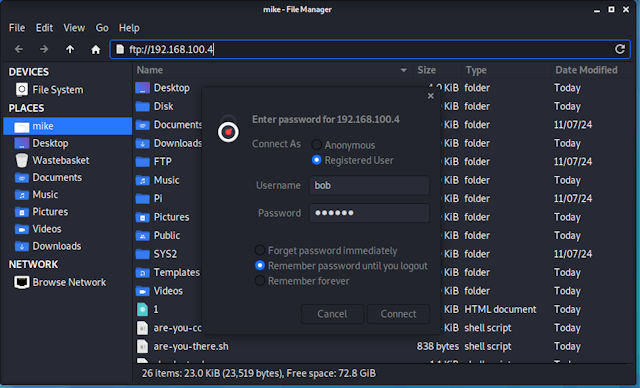
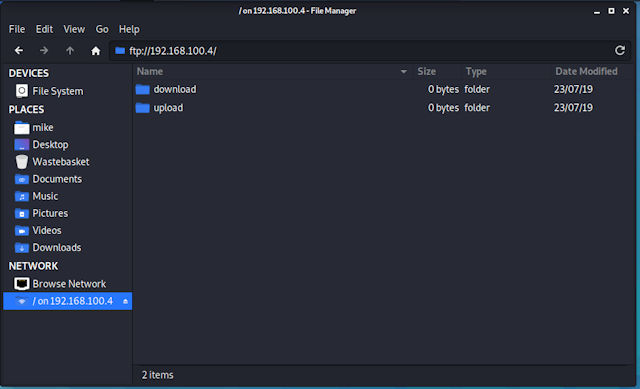
Figure 6 : mounting ftp server into file space.
Alternatively, you can use a web-browser, again just simply type out the protocol://host.
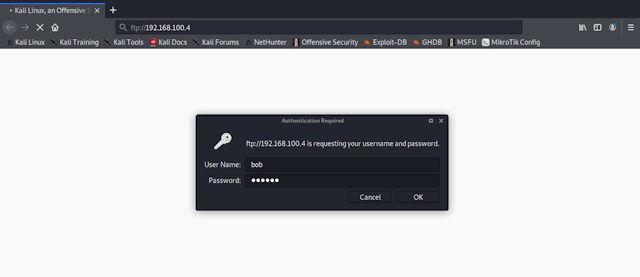
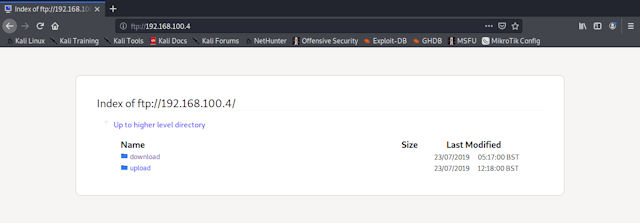
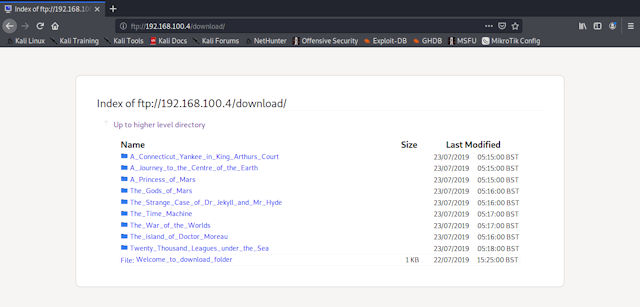
Figure 7 : accessing the ftp server via a web-browser.
Finally, my FTP application of choice is Filezilla Link.
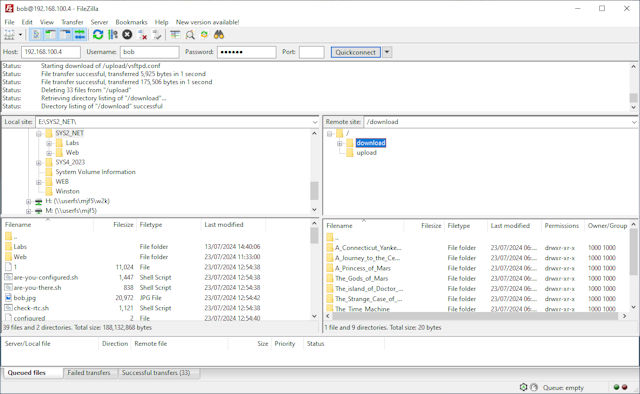
Figure 8 : accessing the ftp server via Filezilla.
This is the easiest protocol to install as typically its already installed if you are running SSH (Link) i.e. you get a secure terminal and secure file transfers are thrown in for free. However, the downside to this is that opening a port to an SSH server on the Internet is going to attract a lot of undesirable traffic, its like bees to honey, port 22 is just irresistible to hackers :). I did once setup an SSH server at home, so that i could access files / data from my home servers at work. The thinking here was that no one would be interested in my home network, no one would be looking for, or find this one open port given the size of the Internet. How wrong i was :(. It must have been only a couple of days before i started to notice the number of failed login attempts in the auth.log file. In some respects it was quite amusing to see the number of attempts made and the passwords used. However, it was unrelenting, even if you blocked one IP address, they would switch to another. Geolocating the IP addresses used these were all coming from China, not to say the machines trying to access my servers were Chinese, just as likely to be network traffic being routed through China from GCHQ :). Therefore, decided that it was best to turn this server off. However, fundamentally nothing insecure about SFTP, just make sure you have a good password, and you will get free password strength testing thrown in for free :).
If not already enabled to install / enable an SSH server on the Pi, simply type:
sudo raspi-config
Then follow the prompts below:
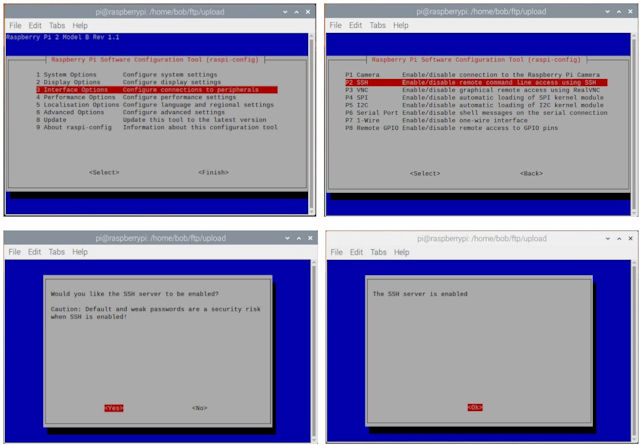
Figure 9 : enabling SSH and SFTP
Note, remember that if someone has SFTP access they generally will also have SSH so can see and move around a system's filing system like any other user i.e. what they can read or write to is defined by your normal file permissions Owner:Group:Others, Read:Write:Execute. So if you don't want someone reading your data make sure you have your folder / file permission set correctly.
Like the FTP protocol, the SSH protocol comes with a useful commandline tool for transferring files based on the Secure Copy Protocol (Link). To copy a file from a Local host to a Remote server:
scp file.txt bob@192.168.100.4:/home/bob
To copy a file from a Remote server to a Local host:
scp bob@192.168.100.4:/home/bob/file.txt .
To copy multiple files using SCP you can use either of these command formats i.e. specific names or wildcards:
scp file1.txt file2.txt bob@192.168.100.4:/home/bob
scp bob@192.168.100.4:/home/bob/*.txt /home/mike
Below are some screen shots of SCP in action. Note you can use SCP in scripts, however, passing the password can be a bit tricky, the easiest way ive found is to use the expect command Link):
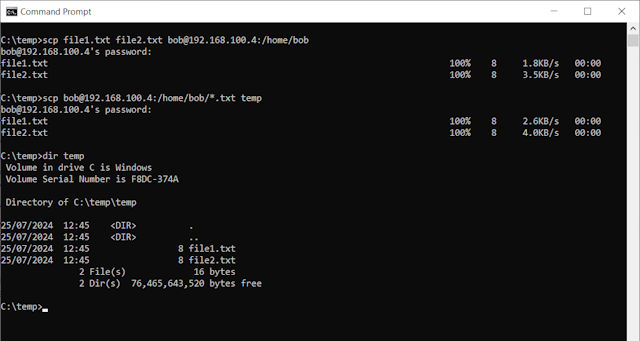
Figure 10 : SCP examples.
Again, as with the FTP protocol most OSs will allow you to use SFTP to mount the server into the filing system, the same format protocol://host, but this time all traffic is encrypted :). However, web-browsers to my knowledge don't like SFTP.
Another unencrypted protocol that can be used if you just need a download file transfer capability is HTTP. This is sometimes useful in that we can setup a custom user interface using simple HTML i.e. flexible and can be access by all network enabled devices without special software. However, first you need to have a webserver running, if not already installed:
sudo apt-get install apache2
To add some level of password control we need to create a password file for each webpage. First create a password file:
sudo htpasswd -c /etc/apache2/.htpasswd bob
sudo chmod 755 /etc/apache2/.htpasswd
Next, create a .htaccess file in the folder that needs to be password protected e.g. /var/www/html/.htaccess
AuthType Basic
AuthUserFile /etc/apache2/.htpasswd
AuthName "Enter password"
Require valid-user
Remembering to make this file readable to all:
chmod 755 /var/www/secret/.htaccess
Finally, need to allow the .htaccess to override the Apache2 default settings by updating the file: /etc/apache2/sites-enabled/000-default:
AllowOverride All
Like the FTP server this HTTP root directory contains the download folder i.e. the files which can be accessed via a web-browser, as shown below:
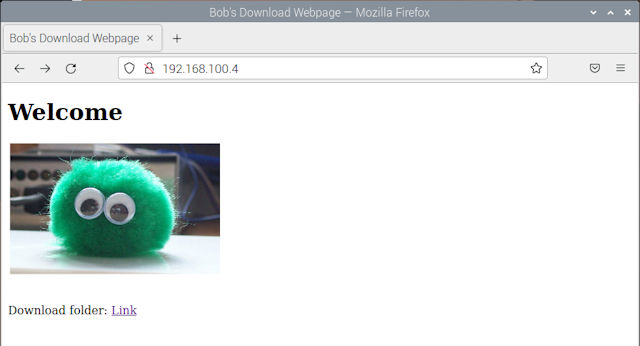
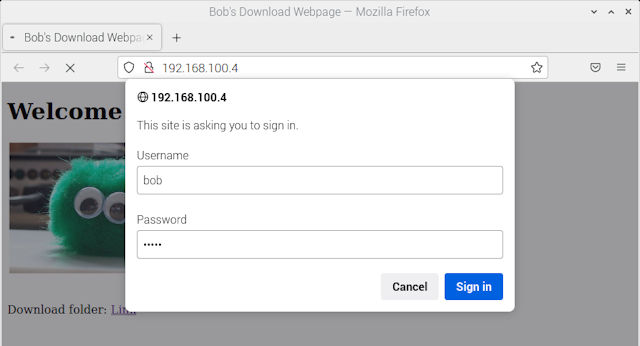
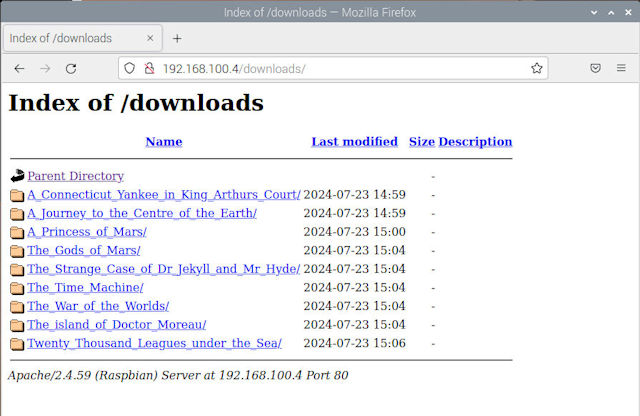
Figure 11 : HTTP download example.
The files used by these FTP, SFTP and HTTP servers were sourced form the Project Gutenberg (Link).

Figure 12 : Project Gutenberg
This website contains a collection of free ebooks and audio books. To download these you can just use a web-browser and click on a link, BUT, when you have a 100+ links this is a bit of a pain :(. However, we have WGET, just cut-and-paste the URL for first chapter and then away we go :). Example script below:
#!/bin/sh
for i in $(seq 1 28)
do
  if test $i -lt 10
  then
    wget https://www.gutenberg.org/files/26291/mp3/26291-0$i.mp3
  else
    wget https://www.gutenberg.org/files/26291/mp3/26291-$i.mp3
  fi
done
WORK IN PROGRESS

This work is licensed under a Creative Commons Attribution-NonCommercial-NoDerivatives 4.0 International License.
Contact email: mike@simplecpudesign.com