Currently when testing our simpleCPU code we have two choices ISim (figure 1) or CPUSim (figure 2). Both have their advantages and disadvantages. ISim is a low level simulator, allowing cycle accurate simulations, allowing a user to judge what will happen on the hardware if they were to upload their design into an FPGA. The downside of cycle accurate simulations are that they are slowwwwww, and the green squiggles are sometimes a bit overwhelming :). At the other end of the spectrum we have CPUSim that abstracts away from the hardware i.e. removes the AND / OR gates, defining the processor in terms of a Register Transfer Level (RTL) description. The advantage of this approach is that it will be faster, as we are not simulating the state of raw bits, signal on "wires" etc. The downside of CPUSim is that it is optimised around the simulations of simple instruction-sets, therefore, its a bit tricky to simulate the SimpleCPU_v1d using this software i.e. the register addressing mode instruction where the opcode is split across the low and high nibble. For more information on how the RTL model of the SimpleCPU_v1a was implement in CPUSim have a look here: (Link).
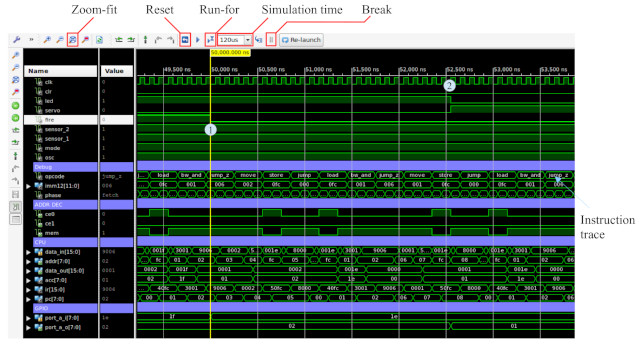
Figure 1 : ISim simulation
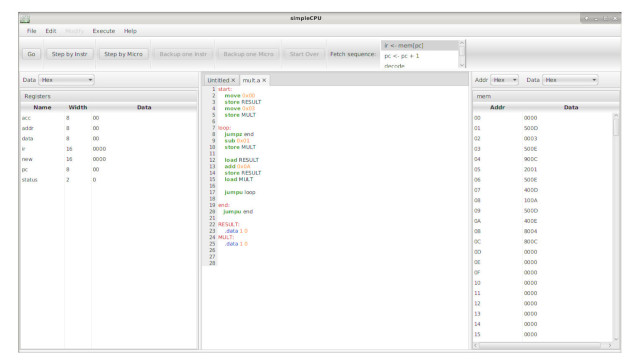
Figure 2 : CPUSim simulation
Therefore, i decided to write some simple python based instruction-set simulators to go with the simple python based assembler. Note, i'm using the word "simple" a lot here to lower expectations :). The primary aim of these simulators is to allow students to test out ideas, to test out fragments of code, rather than big programs, or programs that interact with GPIO, or process large amounts of data stored in memory etc.
SimpleCPU v1a - version 1.0
SimpleCPU v1d - version 1.0
SimpleCPU v1a & SimpleCPU v1d simulators version 1.1
SimpleCPU v1a version 1.2
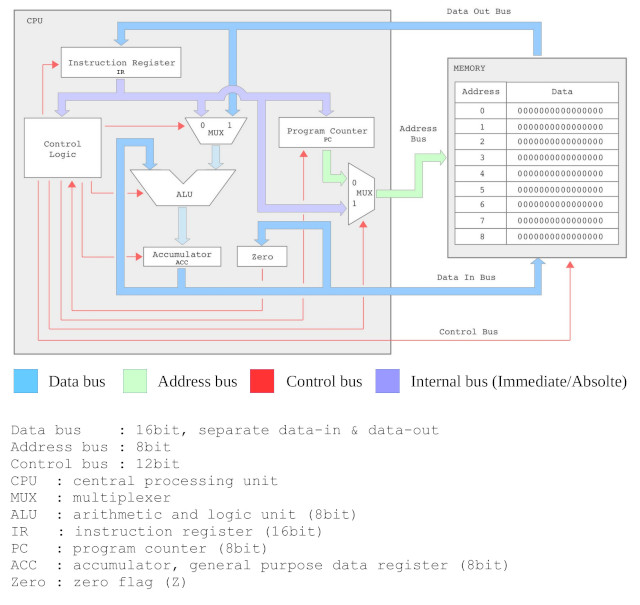
Figure 3 : SimpleCPU version 1
This processor is a simple accumulator based architecture, having a very limited 1-operand instruction-set:
MOVE   KK : 0000 XXXX KKKKKKKK : ACC <- ACC
ADD    KK : 0001 XXXX KKKKKKKK : ACC <- ACC + KK
SUB    KK : 0010 XXXX KKKKKKKK : ACC <- ACC - KK
AND    KK : 0011 XXXX KKKKKKKK : ACC <- ACC & KK
LOAD   AA : 0100 XXXX AAAAAAAA : ACC <- M[AA]
STORE  AA : 0101 XXXX AAAAAAAA : M[AA] <- ACC
JUMPU  AA : 1000 XXXX AAAAAAAA : PC <- AA
JUMPZ  AA : 1001 XXXX AAAAAAAA : IF ACC==0 THEN PC <- AA ELSE PC <- PC + 1
JUMPNZ AA : 1010 XXXX AAAAAAAA : IF ACC!=0 THEN PC <- AA ELSE PC <- PC + 1
where X=Not-used, K=Constant and A=Address. For more information on the SimpleCPU_v1a have a look here: (Link). In addition to having a simple instruction-set this processor also has a very small memory, having only 256 addresses, thats not to say you can't write long looping programs, but in general the type of programs written for this processor will be small, therefore, making it ideally suited for a simple instruction-set simulator. Before writing this simulator we first need to decide how it will be tested, decided on the test code below. Testing a processor's instruction-set is always compromise i.e. testing normal usage and edge cases, but its "impossible" to test all possible combinations of instructions and data. However, i think this code is a good compromise. You can download a copy of this code here :(Link).
###################
# INSTRUCTION-SET #
###################

# INSTR   IR15 IR14 IR13 IR12 IR11 IR10 IR09 IR08 IR07 IR06 IR05 IR04 IR03 IR02 IR01 IR00
# MOVE    0    0    0    0    X    X    X    X    K    K    K    K    K    K    K    K
# ADD     0    0    0    1    X    X    X    X    K    K    K    K    K    K    K    K
# SUB     0    0    1    0    X    X    X    X    K    K    K    K    K    K    K    K
# AND     0    0    1    1    X    X    X    X    K    K    K    K    K    K    K    K

# LOAD    0    1    0    0    X    X    X    X    A    A    A    A    A    A    A    A
# STORE   0    1    0    1    X    X    X    X    A    A    A    A    A    A    A    A
# ADDM    0    1    1    0    X    X    X    X    A    A    A    A    A    A    A    A
# SUBM    0    1    1    1    X    X    X    X    A    A    A    A    A    A    A    A

# JUMPU   1    0    0    0    X    X    X    X    A    A    A    A    A    A    A    A
# JUMPZ   1    0    0    1    X    X    X    X    A    A    A    A    A    A    A    A
# JUMPNZ  1    0    1    0    X    X    X    X    A    A    A    A    A    A    A    A
# JUMPC   1    0    1    1    X    X    X    X    A    A    A    A    A    A    A    A        -- NOT IMPLEMENTED

########
# CODE #
########

start:
  move 1            # acc = 1
  move 3            # acc = 3
  move 7            # acc = 7
  move 15           # acc = 15    F
  move 31           # acc = 31   1F
  move 63           # acc = 63   3F
  move 127          # acc = 127  7F
  move 255          # acc = 255  FF

  add 1             # acc = 0     0
  add 3             # acc = 3     3
  add 7             # acc = 10    A
  add 15            # acc = 25   19
  add 31            # acc = 56   38
  add 63            # acc = 119  77
  add 127           # acc = 246  F6
  add 255           # acc = 245  F5

  sub 1             # acc = 244  F4
  sub 3             # acc = 241  F1
  sub 7             # acc = 234  EA
  sub 15            # acc = 219  DB
  sub 31            # acc = 188  BC
  sub 63            # acc = 125  7D
  sub 127           # acc = 254  FE
  sub 255           # acc = 255  FF

  and 255           # acc = 255  FF
  and 127           # acc = 127  7F
  and 63            # acc = 63   3F
  and 31            # acc = 31   1F
  and 15            # acc = 15    F
  and 7             # acc = 7     7
  and 3             # acc = 3     3
  and 1             # acc = 1     1

  move 1            # acc = 1     1
  store A           # M[87] = 1
  move 3            # acc = 3     3
  store B           # M[88] = 3
  move 7            # acc = 7     7
  store C           # M[89] = 7
  move 15           # acc = 15    F
  store D           # M[90] = 15
  move 31           # acc = 31    1F
  store E           # M[91] = 31
  move 63           # acc = 63    3F
  store F           # M[92] = 63
  move 127          # acc = 127   7F
  store G           # M[93] = 127
  move 255          # acc = 255   FF
  store H           # M[94] = 255

  load A            # acc = M[87] = 1     1
  load B            # acc = M[88] = 3     3
  load C            # acc = M[89] = 7     7
  load D            # acc = M[90] = 15    F
  load E            # acc = M[91] = 31   1F
  load F            # acc = M[92] = 63   3F
  load G            # acc = M[93] = 127  7F
  load H            # acc = M[94] = 255  FF

  addm A            # acc = 0     0
  addm B            # acc = 3     3
  addm C            # acc = 10    A
  addm D            # acc = 25   19
  addm E            # acc = 56   38
  addm F            # acc = 119  77
  addm G            # acc = 246  F6
  addm H            # acc = 245  F5

  subm A            # acc = 244  F4
  subm B            # acc = 241  F1
  subm C            # acc = 234  EA
  subm D            # acc = 219  DB
  subm E            # acc = 188  BC
  subm F            # acc = 125  7D
  subm G            # acc = 254  FE
  subm H            # acc = 255  FF

  and 0             # acc = 0
  jumpz b1          # TAKEN
  move 255          # set acc to 255 if error

b1:
  add 1             # acc = 1
  jumpnz b2         # TAKEN
  move 255          # set acc to 255 if error

b2:
  and 0             # acc = 0
  jumpnz b3         # FALSE
  jumpu b4          # unconditional jump
b3:
  move 255          # set acc to 255 if error

b4:
  add 1             # acc = 1
  jumpz b5          # FALSE
  jumpu b6          # unconditional jump
b5:
  move 255          # set acc to 255 if error

b6:
  jumpu start       # jump back to start

A:
  .data 0
B:
  .data 0
C:
  .data 0
D:
  .data 0
E:
  .data 0
F:
  .data 0
G:
  .data 0
H:
  .data 0
The instruction-set simulator takes as its input the raw machine code generated by the assembler. The simulator could of been implemented in a similar way as the minimalCPU instruction-set simulator: (Link) i.e. simulates the raw assembly language. However, i decided to base this simulator around the simulation of machine-code files, rather than assembler code, as this would allow some more specialised coding examples e.g. self modifying code, and would hopefully be a common platform for the later development of the SimpleCPUv1d's instruction-set simulator. The primary aims of the instruction-set simulator are to:
The first version of the SimpleCPUv1a instruction-set simulator is shown below. You can download a copy of this code here :(Link).
#!/usr/bin/python3
import getopt
import sys
import os
import re
import time
if sys.platform =='win32':
import msvcrt
else:
import tty
import termios
###################
# INSTRUCTION-SET #
###################
# a very simple instruction set simulator for the simpleCPUv1a,
# input file is a .dat file generated by the assembler i.e.
# AAAA DDDDDDDDDDDDDDD, a deciaml address (A) and a 16bit binary (D)
# machine code instruction.
# INSTR IR15 IR14 IR13 IR12 IR11 IR10 IR09 IR08 IR07 IR06 IR05 IR04 IR03 IR02 IR01 IR00
# MOVE 0 0 0 0 X X X X K K K K K K K K
# ADD 0 0 0 1 X X X X K K K K K K K K
# SUB 0 0 1 0 X X X X K K K K K K K K
# AND 0 0 1 1 X X X X K K K K K K K K
# LOAD 0 1 0 0 X X X X A A A A A A A A
# STORE 0 1 0 1 X X X X A A A A A A A A
# ADDM 0 1 1 0 X X X X A A A A A A A A
# SUBM 0 1 1 1 X X X X A A A A A A A A
# JUMPU 1 0 0 0 X X X X A A A A A A A A
# JUMPZ 1 0 0 1 X X X X A A A A A A A A
# JUMPNZ 1 0 1 0 X X X X A A A A A A A A
# JUMPC 1 0 1 1 X X X X A A A A A A A A
# .data IMM
#############
# FUNCTIONS #
#############
def get_key():
if sys.platform == 'win32':
return msvcrt.getch().decode('utf-8')
else:
fd = sys.stdin.fileno()
old_settings = termios.tcgetattr(fd)
try:
tty.setraw(sys.stdin.fileno())
ch = sys.stdin.read(1)
finally:
termios.tcsetattr(fd, termios.TCSADRAIN, old_settings)
return ch
def pad(number):
if number <10:
return "00" + str(number)
elif number >9 and number <100:
return "0" + str(number)
else:
return str(number)
################
# MAIN PROGRAM #
################
def simple_cpu_v1a_simulator(argv):
if len(sys.argv) <= 1:
print ("Usage: simple_cpu_v1d_simulator.py -i ")
print (" -b
To run this simulator you first have to assemble the code, this is done using the python based assembler available here: (Link). A screenshot of this in action is shown in figure 4, the -i parameter specifies the input file name (code.asm) and the -o parameter specifies the output file name (code.asm).


Figure 4 : Assembling code
Remember that the file to be assembled must end with the extension .asm, be in the same directory as the assembler and not on a network drive. If you get the "number of lines" message, no errors and the assembler does not crash :), you will find a .dat file in the same directory, as shown in figure 5.

Figure 5 : Files
Note, if you run the assembler with the debug mode enabled: -d 1, the assembler will display the address in memory of each label, as shown in figure 6. Knowing the address of each label can be helpful when running the instruction-set simulater later. If you enable "advanced" debug mode : -d 2, the assembler will display each instructions machine-code.
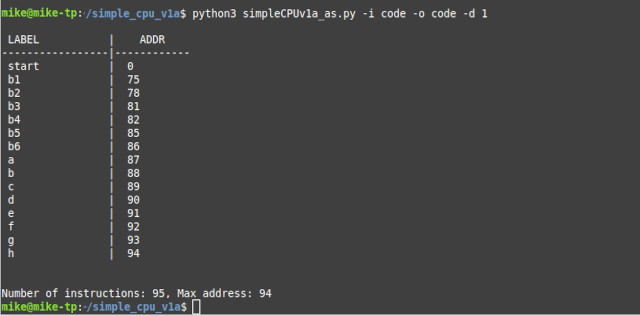
Figure 6 : Label addresses
The code.dat file is an "object code" file containing the address and machine code values that will be used to generate the other object code formats used by the Xilinx tools e.g. .asc and .mem, these formats are discussed here: (Link). A snippet of this file is shown below (middle section cut to save space):
0000 0000000000000001
0001 0000000000000011
0002 0000000000000111
0003 0000000000001111
0004 0000000000011111
0005 0000000000111111
0006 0000000001111111
0007 0000000011111111

...

0084 1000000001010110
0085 0000000011111111
0086 1000000000000000
0087 0000000000000000
0088 0000000000000000
0089 0000000000000000
0090 0000000000000000
0091 0000000000000000
0092 0000000000000000
0093 0000000000000000
0094 0000000000000000
Each line is a memory location, line format is "AAAA DDDDDDDDDDDDDDDD", the address (AAAA) in memory and 16bit binary data (DDDDDDDDDDDDDDDD), representing either data, or an instruction. A screenshot of this instruction-set simulator in action is shown in figure 7. Note, the -i parameter specifies the input file name i.e. code.dat shown in this example.

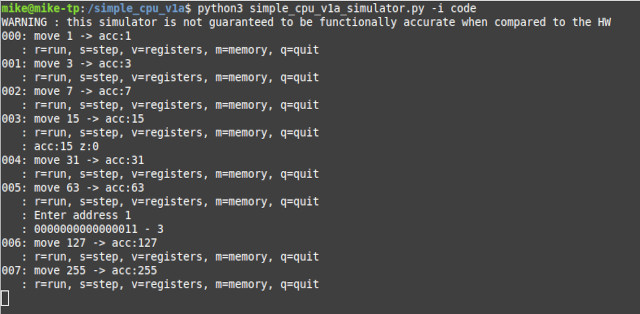
Figure 7 : running a simulation
Once the simulator has executed the first instruction the user can single step through the program i.e. one instruction at a time, by pressing the S key, or run to completion by pressing the R key, or finish by pressing the Q key. Note, if you press the R key and you code get stuck in an infinite loop, CRTL-C is your friend :). Whilst in simple step mode pressing the V key will display the state of the processor's registers i.e. the accumulator (acc) and program counter (pc). If the M key is pressed the user will prompted to enter an address, the data at this address is displayed as a binary and decimal value.
The first version of the SimpleCPUv1d instruction-set simulator is shown below. Again, don't judge :), there are definitely things i need to restructure in the code, but it works and if nobody looks at the code tooooo closely its allllll fine :). You can download a copy of this code here :(Link). This version of the instruction-set simulator builds on the basic framework of the simpleCPUv1a. Note, not all instructions have been implemented i.e. only the instructions used in the labs have been implemented, the optional instructions used in the open assessment are listed in the code, but their functionality has not been implemented. However, i would hope given the cut-&-paste nature of this code it would be a relatively simple task for someone to add these. As always need to do a bit more testing in Windows, rather than on Linux.
#!/usr/bin/python3
import getopt
import sys
import os
import re
import time
if sys.platform =='win32':
import msvcrt
else:
import tty
import termios
###################
# INSTRUCTION-SET #
###################
# a very simple instruction set simulator for the simpleCPUv1d,
# program file plain text, single step through program.
###################
# INSTRUCTION-SET #
###################
# INSTR IR15 IR14 IR13 IR12 IR11 IR10 IR09 IR08 IR07 IR06 IR05 IR04 IR03 IR02 IR01 IR00
# MOVE 0 0 0 0 RD RD X X K K K K K K K K
# ADD 0 0 0 1 RD RD X X K K K K K K K K
# SUB 0 0 1 0 RD RD X X K K K K K K K K
# AND 0 0 1 1 RD RD X X K K K K K K K K
# LOAD 0 1 0 0 A A A A A A A A A A A A
# STORE 0 1 0 1 A A A A A A A A A A A A
# ADDM 0 1 1 0 A A A A A A A A A A A A
# SUBM 0 1 1 1 A A A A A A A A A A A A
# JUMPU 1 0 0 0 A A A A A A A A A A A A
# JUMPZ 1 0 0 1 A A A A A A A A A A A A
# JUMPNZ 1 0 1 0 A A A A A A A A A A A A
# JUMPC 1 0 1 1 A A A A A A A A A A A A
# CALL 1 1 0 0 A A A A A A A A A A A A
# OR 1 1 0 1 RD RD X X K K K K K K K K -- Version 1.2
# XOP1 1 1 1 0 U U U U U U U U U U U U -- NOT IMPLEMENTED
# RET 1 1 1 1 X X X X X X X X 0 0 0 0
# MOVE 1 1 1 1 RD RD RS RS X X X X 0 0 0 1
# LOAD 1 1 1 1 RD RD RS RS X X X X 0 0 1 0 -- REG INDIRECT
# STORE 1 1 1 1 RD RD RS RS X X X X 0 0 1 1 -- REG INDIRECT
# ROL 1 1 1 1 RSD RSD X X X X X X 0 1 0 0 -- Version 1.1
# ROR 1 1 1 1 RSD RSD X X X X X X 0 1 0 1 -- NOT IMPLEMENTED
# ADD 1 1 1 1 RD RD RS RS X X X X 0 1 1 0 -- NOT IMPLEMENTED
# SUB 1 1 1 1 RD RD RS RS X X X X 0 1 1 1 -- NOT IMPLEMENTED
# AND 1 1 1 1 RD RD RS RS X X X X 1 0 0 0 -- NOT IMPLEMENTED
# OR 1 1 1 1 RD RD RS RS X X X X 1 0 0 1 -- NOT IMPLEMENTED
# XOR 1 1 1 1 RD RD RS RS X X X X 1 0 1 0 -- Version 1.1
# ASL 1 1 1 1 RD RD RS RS X X X X 1 0 1 1 -- Version 1.2
# XOP2 1 1 1 1 RD RD RS RS X X X X 1 1 0 0 -- NOT IMPLEMENTED REG INDIRECT
# XOP3 1 1 1 1 RD RD RS RS X X X X 1 1 0 1 -- NOT IMPLEMENTED
# XOP4 1 1 1 1 RD RD RS RS X X X X 1 1 1 0 -- NOT IMPLEMENTED REG INDIRECT
# XOP5 1 1 1 1 RD RD RS RS X X X X 1 1 1 1 -- NOT IMPLEMENTED
# .data IMM
#############
# FUNCTIONS #
#############
def get_key():
if sys.platform == 'win32':
return msvcrt.getch().decode('utf-8')
else:
fd = sys.stdin.fileno()
old_settings = termios.tcgetattr(fd)
try:
tty.setraw(sys.stdin.fileno())
ch = sys.stdin.read(1)
finally:
termios.tcsetattr(fd, termios.TCSADRAIN, old_settings)
return ch
# 1000 - 4095
# 0100 - 0999
# 0010 - 0099
# 0000 - 0009
def pad(number):
if number<10:
return "000" + str(number)
elif number>9 and number<100:
return "00" + str(number)
elif number>99 and number<1000:
return "0" + str(number)
else:
return str(number)
def getReg( reg, ra, rb, rc, rd ):
if reg == "00":
return ra
elif reg == "01":
return rb
elif reg == "10":
return rc
elif reg == "11":
return rd
else:
print("Error: invalid reg: " + str(regx))
sys.exit(1)
################
# MAIN PROGRAM #
################
def simple_cpu_v1d_simulator(argv):
if len(sys.argv) <= 1:
print ("Usage: simple_cpu_v1d_simulator.py -i ")
print (" -b
Stuff still to do:
Figure 8 : EDSAC's "display"
However, ignoring all these "could does" i think these instruction-set simulators are fine for their intended purpose, to allow students to test out code fragments, rather than having to go to Xilinx ISim and running a full cycle accurate simulation. As always i will add a buyer beware warning, this code was tested by me :)
A few updates, a few corrections, as always some bugs, you can download a copy of this code here :
The main updates are that you can now have multiple breakpoints e.g. -b "100 300" will cause the simulator to pause at address 100 and at address 300. Note, this parameter can be a single number of a list. Also CTRL-C will now generate a trap signal, therefore, you can now stop a running simulation by pressing CTRL-C, this will not terminate the program, rather this signal is treated as a "manual" breakpoint, allowing a user to examine registers and memory etc, before either restarting the simulation or exitting the simulator.
A bug fix, forgot that the MOVE and LOAD instructions will also update the Z flag, you can download a copy of this code here :
Also added the two operand STORE instruction that was discussed in lecture 5C. This new instruction can be identified in the ISS via the number of operands used:
STORE 10        # old 1-operand store instruction, if ACC contain 20, then M[10] <- 0000 0000 00010100
STORE 8 10      # new 2-operand store instruction, if ACC contain 20, then M[10] <- 1000 0000 00010100
Now the STORE instruction stores the ACC and a fixed 4bit nibble to the specified absolute address. Therefore, in the above example the constant 8 is written to the high nibble of the high byte and the ACC to the low byte of memory location 20. This simulator also supports the CPUSim syntax of this instruction. CPUSim does not allow instructions to be identified by the number of operands used, therefore, a distinct opcode needs to be defined i.e. STORE2, this "new" instruction is assigned the opcode 0xC, so the instruction below is the same as the previous 2-operand example:
STORE2 8 10 # if ACC contain 20, then M[10] <- 1000 0000 00010100

This work is licensed under a Creative Commons Attribution-NonCommercial-NoDerivatives 4.0 International License.
Contact email: mike@simplecpudesign.com